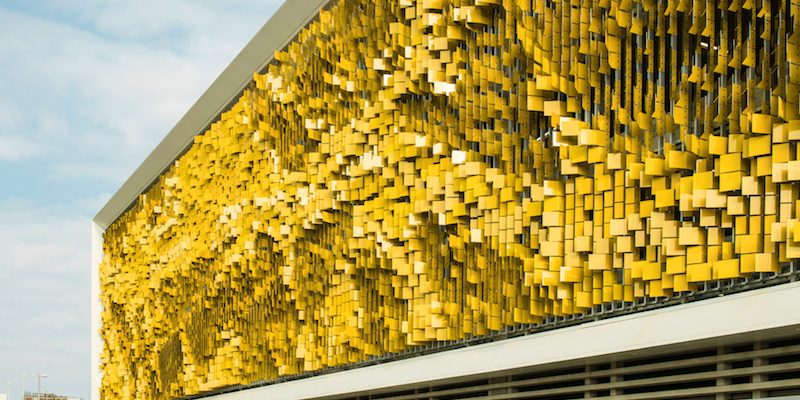
“May/September” by Rob Ley. 2014. Eskenazi Hospital, Indianapolis, IN.
Photo courtesy Eskenazi Health, Photo: Hadley Fruits.
We recently posted How to Photograph Your Artwork: Professional Photos Without the Cost, which focused on photographing two-dimensional works. This week we’ll cover how to photograph sculpture, ceramics and other three-dimensional art.
Photographing 3D works has its own unique challenges. How do you best capture the dimensionality and volume of the art? How do you capture its texture and avoid losing details? We’ve broken down the process into simple steps.
Step 1: Position your art
- Place the art on a flat surface with a neutral background.
- If you don’t have white or light gray walls, buy a roll of seamless paper and set up a sweep. What is a sweep? It is a smooth and continuous backdrop formed by paper in an arc shape. To form an arc with the paper, tape it to the edge of the table/flat surface and sweep it to a vertical point behind the table/flat surface.
- Don’t place the art too close to the background; give it some space. If using a sweep, don’t place the artwork where it starts to sweep up.
Step 2: Light the art
- If you want even, diffused light, position two lights 45 degrees away from the art. Learn how to easily accomplish this in our post about photographing 2D works.
- If you want contrast and shadows, use two lights and play with moving one of the lights around (adjust distance and angle from object). Avoid competing shadows that will make it hard for the viewer to focus on the work itself.
- Add a third light if you need more dimensionality.
- If photographing ceramics, it is recommended to use only one light, and to place it directly over the subject so the light shines down onto it. This creates a shadow under the bottom edge and grounds the object.
- Adjust the softness of the light by raising or lowering the light. The closer the light is to the subject, the larger and softer the light will be. Soft light lessens the harsh edges of shadows and creates smooth gradations of tone and color.
- Use a diffuser. A diffuser is made of translucent material and is placed between the object and light source to soften the light and shadows.
- Shape the light with cardboard. Place the cardboard between the work and the light and play with angling it to create preferred gradients.
- Tip: Strong shadows create a sense of weight to a piece, which allows a potential buyer to imagine how it would feel to be held.
Step 3: Set your camera settings
- Set the camera to shoot in RAW so you get the most digital information in your image.
- Be sure to set the ISO to 100 to reduce the “noise” in the image.
- Set the camera to Aperture Priority and set the aperture to f/8 or higher to get your entire work in focus (if you want it in sharp detail). You want a larger depth of field when shooting a work up close – more depth means more details.
- Set your white balance. Our earlier post walks you through the process. If you want to set a custom white balance to get your whites absolutely white in challenging light situations, we recommend using a gray card. Never used one before? Here is an article describing how to use a gray card.
Step 4: Position your camera
- Place your camera on a tripod or a secure platform like a shelf to avoid camera shake and blurry photos.
- Play with angling the camera to capture different perspectives of the work – shoot straight on or from above.
- Place the tripod so that the art fills almost the entire frame. Avoid distortions by zooming.
Step 5: Snap away
- Make sure to photograph your work from multiple angles.
- If you’re not using a tripod, use your camera’s timer so that your pressing of the shutter does not create camera shake – it doesn’t take much!
- Shooting an installation? Use a wide-angle lens to capture the entirety of the work. Wide-angle lenses allow you to get more in the frame.
Step 6: Edit your photos
- Crop the image.
- Adjust color, focus, and contrast if necessary.
- Save as a JPEG or TIFF. You can make derivative JPEGs from your TIFF to match upload requirements — like CaFE’s, which just changed to make your life easier! Read about the CaFE Update.
More of a visual-type of person? Watch this YouTube video by Dan Meyers to get more advice and techniques for photographing your 3D work.
Now start propping, lighting and snapping professional-looking photos of your 3D works and get it uploaded to your CaFE portfolio so you can start submitting wow-worthy photos of your art.
Written by Elysian Koglmeier